I'm polishing a screenplay about my interaction with a master artist. He reminds me of Robert de Niro. There's a twist. I want to send this to an agent in California who is involved with a nonprofit I highly respect.
I have a musical about being a dollmaker. It's about kids of all ages. I got some friends to read it. They cried at some parts. It's kinda sad, but there is redemption. I am sending this to a nonprofit organization with a famous founder.
I wrote a memoir from an artist's perspective of tips from my "mentors" from a certain time period. Some of them are famous.
I wrote another book about my encounter with a healer.
As an artist, I'm being watched by a few top galleries. I have yet to sell one piece, but I'm holding out because of a tip from a person who is highly regarded in the art field.
I've been going to Book Expo America, where I learn trends in the publishing industry and writing. When it rains, it pours, I believe, so I keep writing, just in case I start getting noticed -- which is now happening.
I guess this is what I can currently mention.
Tuesday, December 13, 2011
Thursday, October 20, 2011
Doll Heads and Their Plaster Molds

It's way past bedtime, and I just wanted to share this with you. Today, I spent time making 8 heads. My "fantasy" was to make 30 full sets in one day. Obviously this was not to happen. I only got to this point, not because I'm lazy, but because all this just takes time. You have to have some patience. You also need to assure yourself that eventually you'll see some finished works.

I currently have 8 faces which can fit the current body that I have. This is the first full set, so I admit they are rough. I wonder if I should just maintain that roughness in all my future works. I was told by a gallery owner to keep it rough and don't even paint them. I still want to see how they would look like painted and dressed. Another gallery owner told me I need to refine it some more. I tend to agree, but I'm still proud of my progress. As soon as I start working on a new set of faces and bodies, I know I'll see an evolution of my work, which makes this worthwhile and worth showing (or even touring).


Monday, October 17, 2011
How 200 grams of FASTfire BRONZclay looks like

I took these quick pictures of a pack of 200 grams FASTfire BRONZclay to show you how the actual pack looks like.
Like me, if you haven't really seen a pack of bronze clay, you would probably be surprised at the amount of clay you would receive. Like me, you probably would have been expective more than what gets shipped to you.
It took me weeks to make a decision to purchase a pack, and when I did, I waited for four days, impatiently tracking the UPS package online. On the day it was supposed to arrive, I had to wait outside my building to make sure that I don't miss the UPS truck, because my building has a problem with deliveries--there's no way for anyone to buzz the residents from the outside and our building has a reputation for missing deliveries and we end up going to the UPS (or Fedex) warehouse.
On that day, my phone rang, and I went inside to my unit, where I entertained a friend gripe about stuff. Then I remembered to come out again, while still on the phone, and, sure enough, I saw the UPS truck past my building and already parked on the next block! I ran and chase it, and waited for the driver to come back. Luckily I got my package!
Within the four days of waiting, I went to two art stores, just to pass the time, and I looked at some polymer clay packs, visualizing what the bronze clay pack would be like. I visualized the 200-gram amount to be a huge brick! My thoughts were on making huge villages with mountains in the backdrop made of bronze clay! Needless to say, I was disappointed at the amount that came in the mail.
NOTE: After the discussions about the pics, make sure you read the section below. I also ordered activated carbon, which I will mention later.

In the picture above, I placed the pack on top of a letter-sized (8 1/2 inches x 11 inches) unopened ream of paper and by a Sharpie pen. I figured most of you out there, especially artists, would have the paper and Sharpies around.
Online, I thought that the pictures of the PMC (precious metal clay) packages were just showing the label. It turns out, those flat-looking images are the actual packages themselves! They just happen to look flat because the clay inside is flat. The wrapper looks like plastic and foil, to make sure that the clay does not dry up.
You can imagine how a 100-gram pack and 50-gram pack would be. They are probably packed the same way but even thinner. I don't think I'll ever buy a 100- or 50-gram pack, because they would be more expensive per gram, and I really could use more than 200 grams.

In the third picture, I folded back the edges of the pack so that what you see is the size of the actual clay inside.
Now, I wonder. Maybe, like me, you are also wondering: if this is bronze, then maybe gold clay is heavier(?) This would mean that the amount of gold clay in a pack might even be smaller than bronze clay! Hopefully only by a small fraction!
I have yet to order gold clay, but as it is, I am hesitant. If I'm going to make settings for my ceramic porcelain dolls, I might have to explore other possibilities other than metal clay. I had always been considering using some type of a darker (earth) clay for accessories, and then coating them with gold leaf. I might want to do that.
There is also something to say about gold leaf. Jewelry is usually electroplated. Metal for jewelry can start with bronze or copper, but before a layer of gold is plated on them, nickel has to be plated on first. Nickel does not oxidize and it acts as a barrier between the gold and the bronze. Without nickel, the bronze, in time, seeps through the gold layer and will oxidize, discoloring the gold. (Read more about this, because I did, and I am not yet considering to do all this.)
Gold leaf is actually more convenient. The layer of glue also serves as a barrier, so that the gold leaf will keep its color for a long time. My purpose for all this "research" is not to make jewelry. Gold leaf for me will do just fine.

The fourth picture shows how thin the pack is. I would say that the thickness is just a little above a quarter of an inch. I thought I was going to get a thick brick of bronze clay!
My estimation is that if you are looking to make jewelry, you can probably make from 8 to 12 decent-sized rings.
ACTIVATED COCONUT SHELL BASED CARBON
You might also forget a few other considerations. So here are some that I remember off-hand.
It turns out, bronze clay needs a kiln, a torch would not work like it would on gold clay. Other PMC's like gold clay can be torched, or placed on a gas stove (with the necessary contraptions). I bought a torch months ago, but I cannot use it on bronze clay. Bronze clay and copper clay oxidize, and so while the necessary temperature is reached, the least amount of oxygen should interact with the clay. Activated carbon is needed. I also had to purchase activated coconut shell-based carbon (approximately $17).
While inside the kiln, the metal clay should have as little contact with oxygen as possible, hence the need to bury the bronze (or copper) in a tray of activated carbon. There are two types of activated carbon available, coal and coconut shell. They are priced the same, but coconut shell is supposed to be better from what I have read.
AND, because of this needed procedure, the carbon needs a TRAY... You must remember that you need to use a tray that can withstand the temperatures of a kiln, and especially, the temperature needed by bronze clay. This means you have to buy the right tray... another expense. I decided to experiment, I have yet to prove this right or wrong...
I had an idea of just making a tray using my porcelain clay so I would not have to buy more and more stuff. I looked at the few trays available online for this process, but nothing sparked my interest. The reason for this is that the trays are mostly flat. Without having seen a pack of bronze clay, with visions of constructing an entire village made of bronze, I thought I need to be flexible with the tray shape. I might want to make something longer and higher than jewelry, so I figured I needed to make my own trays for the carbon.
I stuck to buying just the clay and the carbon, but if you are new to metal clay, and you decide to use bronze or copper, make sure that you also order the activated carbon, and maybe the appropriate tray for it.
Thursday, September 29, 2011
Don't go crazy on China Paint if you are painting porcelain ceramic or (in my case) ball-jointed (BJD) dolls
My swatches in my earlier posts which were made on bisque tiles that were either unglazed, or glazed with satin and matte finishes have a collection of seemingly numerous colors. I personally think I went crazy over the colors, thinking that I should probably satiate my curiosity and save on postage by getting all the colors of the rainbow.
The colors and additives cost me a little less than $300 in my estimation, and I could have gotten away with just spending half of that. What made me want to buy from two vendors were that the collection from Jean Nordquist was already great for painting dolls, but I got curious about the offerings of Paints and Porcelain and the owner Earleen Rowell (link here) was so nice to have given me tips about painting on porcelain that I wanted to buy from her as well. I also wanted to discover for myself the opalescent additives her store carried, which would not be for the dolls but might become useful to know and have experience with for future projects. I have plans to make chess sets in the future. (Chess sets would still break! I'm working with porcelain!)
I would recommend that if you are going to use China Paint for painting landscapes, flowers and still life, that you might want to get a good selection of assorted colors. However, if you're going to exclusively work with porcelain ceramic dolls, then just get a few colors to start. Most of the colors needed are earth tones, and you probably need 5 colors at the most, just for subtle differences in the browns and reds. Even the eye color doesn't have to be blue, it can be earth tone as well.
I'm still out of town and at a cafe, blogging. :-)
Friday, September 23, 2011
MY CURRENT CHINA PAINTS Part 2 for Painting on Porcelain (incl. ball-jointed porcelain dolls) on MATTE and SATIN Glazed Tiles


I think I should use either the matte or satin glazes, as opposed to just painting on unglazed bisque, although my ceramic dolls are fully shrunk and sealed prior to painting. Supposedly the china paint sinks into the glaze, and if the pieces are unglazed, the china paint would still adhere to the doll parts, but it might not be as good. I'm just assuming this. Next time I paint over unglazed, I'll try to scrub the paint off after the kiln stage.
Monday, September 19, 2011
I'm out of town right now
A few months ago I volunteered to do the souvenir program for a theater group which I had joined on and off in the past. I finally finished the souvenir program last Friday at around 2 a.m. I met my deadline, because the Saturday following, I was going out of town for work.
I was so absentminded when I left. I brought my laptop but did not bring my adapter. Luckily I was able to borrow someone else's adapter.
It is now Monday, and I'm still out of town. This trip will be over by Friday, when I should be back in Chicago in time for the opening night. However, I'm going out of town again the following day, Saturday, and again, I won't be back until the following Friday.
Only then will I be able to work again on my dolls, and my goal is to be able to paint at least one. I already got done painting china paint swatches over two glazed tiles, one has a matte finish and another has a satin finish. I had wanted to blog about the two new tiles, like I did about the unglazed bisque tile, but that will have to wait for another 11 days, because the only thing I would be able to do this coming Friday is to go to the opening night of my theater group.
The theater group was hard work, but unfortunately, there would only be three shows, Friday night, and a matinee and an evening show on Saturday. Would have been nice if it was a month-long run, but the producers had problems with the financial part.
Thanks to all those who just recently followed me. I hope you also don't mind if I follow you back.
Saturday, September 10, 2011
MY CURRENT CHINA PAINTS for painting on porcelain (incl. ball-jointed porcelain dolls)

I got the top 4 colors and additives from Jean Nordquist Dolls. It's the Doll Master Set. I had thought about saving money by just ordering a few colors, but towards the end, I realized that I should just get the Master Set, since I would continue to be curious about the rest of the colors they offer. (LINK 1). The last two rows are from Paints and Porcelain. This time, I chose a few colors, some of which I really just wanted. (LINK 2) Once again, I don't expect myself to use all the colors on the ceramic porcelain dolls. Here is another online store Colorific Porcelain (LINK 3), here is another Kathy Peterson's The Good Stuff (LINK 4), here is another Doris M. Ackilli Studio (LINK 5) and here's one more: Virginia LaVorgna (LINK 6). You can follow all the links to their online stores. I really just called the first two, because they were the first on my list. The second link, however, Paints and Porcelain, the owner Earleen Rowell was the most helpful, although she did suggest for me to use the Willoughby china paint I get from her on glazed, and not unglazed, and preferably gloss.
The paints and additives you see above surprisingly total to about $300. Except for the last row, they come in what is called drams, they are like tiny vials. The last row come in liquid form, but they are still small little bottles. The cost added up. Basically, there is no way you would want to order from all the stores.
I used unfinished bisque tile, which I got from Dick Blick's. This would naturally be the first I could share with you, because I painted on the unfinished bisque. I did not just want to see the pigments, but I wanted to see how well they will stick to the surface without any layer of glaze.
I have three more tiles, which I just coated with Amaco Clear Transparent Gloss (very shiny), Amaco Clear Transparent Matte (no shine at all), and Duncan Clear Satin Glaze. The reason I'm using Duncan Clear Satin Glaze is that it was the only satin glaze the store had. I don't (yet) have a preference for brands. I'll share the pictures as soon as I finish painting the china paint on them. There are two tiles at Cone 05 in the kiln right now, so I'm just now curing the glazes before I start painting china paint patches again.
I'm thinking the effect will be different on the glazed tiles because the tiles would be sealed. The ceramic bisque tile above absorbed a lot of mineral oil. The mineral oil did not just float on the surface.
Thursday, September 8, 2011
THE KILN IS NOT A COFFEE WARMER

Making My Improvised Ceramic Stilt
A ceramic stilt is a base or a stand with pointed sharp metal, which look like the tips of sharp nails, strutting out of them. Stilts are used so that the glazed surface does not touch anything, because anything touching will fuse together.


Ceramic glazes and paints are like powdered glass. Once the pieces are glazed or painted, the pieces should not touch each other and the kiln sides and floor. The coats will fuse to whatever they touch, so if two pieces touch, they will fuse together.


The problem with the doll parts, the entire outside surface has to be painted, or glazed, or both. If stilts are used, there would be minute points on the surface of the pieces where stilts would have touched them while firing.


First, I got a few feet of high-temperature wire from the nearby ceramic supply store. This is wire that is supposed to withstand kiln temperatures, not ordinary galvanized iron wire.


After firing the porcelain bases (Cone 6), I threaded the wire through the holes. I was finally able to skewer the doll parts and suspend them while firing. I glazed two sets of doll parts with transparent clear gloss, and had to fire them in two separate batches. The first was more precarious, because I fired the heavy parts first. The second was easier, but altogether, this experiment with the stilt and the first glaze took more than 2 weeks. The shaping and drying of the clay took about 12 days, and the three firings took 3 more days. I’m blogging because I’m still waiting for the 2nd batch of doll parts to cool down.


I've also been busy with my theater group
I am a volunteer for a theater group here in Chicago. Supposedly, I read it somewhere, that there are usually 300 to under 500 theater groups in Chicago in any given year. I'm supposed to make the souvenir program, and take the program to a printer.
Theater groups are supposed to be fun. Tonight, I feel like I've stretched myself thin.
I have this doll project. By now, I have discovered that making ball-jointed dolls, or ceramics, is serious work. A lot of artists paint, that's a given, and not too many work with ceramics. What is "worse," is that I sculpt tiny doll heads, and make molds of small doll body parts, and produce porcelain doll parts from these. Most people who do ceramics can't begin to imagine doing what I do.
I have been stretching myself by volunteering for theater, and doing the monumental solo task of producing and promoting my dollwork. If I have to quit anything, it would be the theater group.
THANKS FOR FOLLOWING ME ON TWITTER! Please keep following me!
After just 14 days, I now have 450 followers! I kinda noticed however, that Twitter has a limited of the number to follow (2,000), so I need to get about just under 1,900 followers before I am able to start following again.
The alternative would be to unfollow some people who don't seem to be actively tweeting anyway.
Nevertheless, 450 in 14 days is a great accomplishment. I noticed a few doll magazines following me, which I think is a vote of confidence. Now I really have to produce (eeks).
Over the last few days, I had taken picture and been composing a blog entry which I have yet to finish. I can't seem to sit around long enough to finish it. I have a few pictures to go with it, but like my other pictures here, I want to chronicle not just my progress, but comment about my pictures as well. I'm making things difficult for me.
Yesterday afternoon I went to the nearby ceramic supply shop, and that took a long time, so I was not able to do much else. I bought more high temp wire, and 4 frits which I want to experiment with. I also bought some glazes and a brown Amaco pencil. I think the pencil can withstand Cone 5. I also bought a clear satin finish glaze and a clear matte finish glaze.
.
I did two sets of firings in the kiln on two sets of doll parts... I wanted to see how clear gloss glaze looked like. I learned two things. First is that gloss glaze is too shiny. If the attempt is to make the dolls appear human, and appear to have human clothes (fabric), then high gloss glaze is not advisable. Secondly, the instructions of coating the pieces three times is valid, because one single layer is not enough to produce an even, glossy surface. I will present pictures of this stage soon.
I'm thinking of what to present on my facebook page, here so that the entries or pictures do not become redundant. Not sure what to do yet.
Tuesday, August 23, 2011
Monday, June 20, 2011
A doll's face on December 23 2010 - Saying goodbye to my camera

I lost my Nikon camera last Saturday. I don't think I left it at the Dana Hotel's Vertigo Sky Lounge (it's a bar). My group had a thing to do, so I was there early at 3 p.m. to help out. The party was to start at 4 p.m. I had no plans to drink early, I had a bottle of Diet Mountain Dew. Angel, the host, threw it out, because he didn't know it was mine, and he offered to get me a drink, but I refused. I got drunk later on when everything was fine and Angel didn't need me anymore. My friend Gabriel was supposed to help out as well, but he had an appointment. When his appointment was over, he came to the venue.
I was just lucky to have Gabriel follow me because we went home together, I remember going down the elevator, walking a few to the McDonald's next to the train stop, and after that I seem to have lost track of time. I recall he bought two bags of food at McDonald's, he ate his on the train while I clutched mine, I remember I dropped a burger on the train, picked it up and put it back in the bag, I remember walking home and as soon as he went into his apartment and I got into mine, I immediately slept on my floor, and tried to get over my drunken stupor by sleeping it off. That must have been around 7 p.m., but it seemed like time flew, like the exit out of the hotel and into my place only took a few minutes. I woke up groggy around after midnight, and then I ate the bag of McDonald's. Even then I ate a double cheeseburger and the second one I couldn't taste enough to figure out if it was a fish fillet or a McChicken. The third thing was an apple pie.

I just want to say goodbye to my camera. I probably deserve losing it. I seldom get drunk and last Saturday, I was not in my safe place, but looking at the photographs (and videos I have yet to post), from that Nikon camera, and at the date I took it, December 23rd, I get the feeling I would get rewarded later on, as long as I keep improving my craft.
I finally make more doll parts on March 2011
I finally make the doll parts for the doll, including the hands and feet. You will notice the shapes and sizes are smaller.

This was in March, but I was busy doing something else in February. I had done some of these above in January, and then I let the pieces air dry all the way to March. The picture above is still in the chalky stage. I had been sanding them, but breaking a lot of them along the way. If you ask me, I need better hands and eyes. Making progress nonetheless.
I worked from New Year's Eve up to noontime on New Years Day
I considered New Year's Day as another "working day." I was into what I was doing, it's not like this art is tedious, not for me. I am doing what I like to do, and I know there will be rewards. I thought I would make progress and I did. I came up with 8 doll heads, which I was happy with. I got to make plaster molds for each one of them.

This first set, I forgot to pierce the ears, but I was not into making any earrings yet, I needed to see how they would look like, before I went ahead to making molds of the body parts.
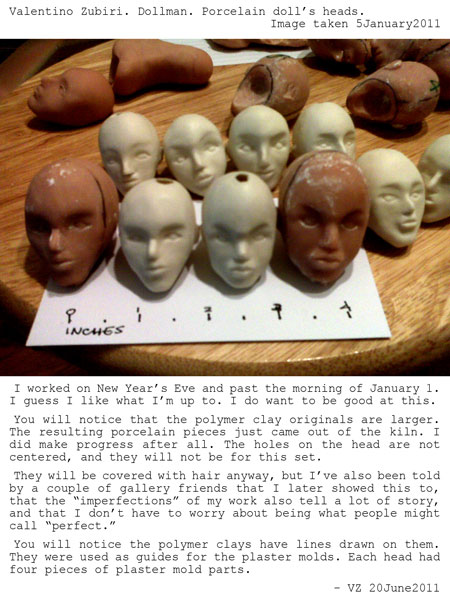
The polymer clay prototypes have lines on them which I used as guides when making the plaster molds. Each plaster mold for each doll head is made up of 4 interlocking pieces: 1. the side for the face, 2. the side for the base (where the neck would attach), and 3. two left and right sides for the back. The hole for pouring would be on the head, and that resulting hole produced on the ceramic would also serve another purpose--the way the head is secured to the rest of the body is through springs and a final wire would hook through the hole on the head.
The head would be covered with hair (or not, if I decide otherwise), so (maybe) the wires and the holes would be hidden from view.
You will notice that the ceramic shrinks after the kiln.
I worked on my art even on Christmas Eve and Christmas Day and made progress
If you look at some of the photographs, some were taken on December 8 and some on December 23, 2010.
I remember working even on Christmas Eve and Christmas Day. I did not go out, nor celebrate with anyone. I always have this thought that on days when I know people are having parties and socializing, I would prefer to be by myself, and try to make progress on whatever endeavor I do. It is a little lonely, but that's another story.

I shelved the first doll design because I thought it was too tall, even though I had already made the plaster molds. It was good practice up to that point, because I was a little afraid of making a smaller, shorter doll, because a smaller doll would mean a smaller face, and tinier features which I did not want to tackle early on. So when I was confident enough to make a shorter doll, I went ahead and started sculpting smaller heads.

At first, I started with baking the eyeballs first, then sticking them into bigger balls that were the heads.

Later on, I realized that although I was just practicing, and baking the works for posterity, I was probably using too much of my polymer clay. So I decided to just make the faces and then add the backs of the heads later if I wanted to.

I started making childlike heads and then childlike faces, and that was because the eyeballs were a little too big for the heads. I also read somewhere that having a wide-eyed look makes people attractive, because that is the young, inquisitive, inviting look of a baby. The way I positioned the eyes and because they don't have eyelids yet, made them look a lot like children.

I knew I had to alter the approach I was doing with the eyes. When I did a different approach to the eyes, I was able to make the faces look a little more mature. I then experimented with making male- and female-looking faces.

Another challenge was to see if I can make the faces look ethnically distinguishable, or something like that. The faces above all look different, but I would still consider them accidents. Even now, I want to keep making faces. I will eventually practice sculpting exact likenesses of people at the scale of an inch from ear to ear.
Sunday, June 19, 2011
The first doll head I was able to make a porcelain ceramic of

Making a ceramic porcelain ball-jointed doll involves a lot of stages, and I soon discovered that each stage had its own set of "trade secrets."
So, I sculpted from polymer clay, and assumed that the shapes could be made into plaster molds, and then into porcelain.

While I was learning to sculpt, I also proceeded to make plaster molds for some parts which I thought was acceptable for the next stage. The reason for this is that I also needed to learn how to make plaster molds, even while I was just learning to use polymer clay.

So while I was also learning how to make plaster molds, I proceeded to make the ceramic slip and pour them into the molds that I had made.

Experience, and going through all the processes / stages are the only way to learn, and I went through a lot of trial and error. Even now, I would not consider myself halfway to becoming an expert.
The head pictured above was my first ever doll's head that I was able to make. Eventually, I was able to match the head with an acceptable set of parts, but I decided that I was torturing myself, in a way, because I had too many parts to manage. I made a torso with detachable / movable breasts, and shoulders that could shrug, and toes that can tiptoe. I also separated the neck from the torso and the head. Then almost overnight, I woke up and thought that I was creating something that was too tall, and I suddenly wanted a smaller doll! So I stopped working on this one, and started work on a smaller doll.
I would probably go back to making this first design later, but not yet.
My plaster molds

I have been asked why I would use plaster molds because plaster molds allow for making several pieces, and so how can an artist claim that the work is one of a kind?
Well, I'm assuming that the person does not understand the processes involved in making a doll, ball-jointed doll, or any type of porcelain or ceramic sculpture. Some knowledgeable people would laugh this off, and be kind of insulting. Maybe I would tell the person to research some more on his or her own the things or factors that are involved in ceramics.

The only way forms like the doll pieces can be created is by using a plaster mold, and the only way a plaster mold can be created is by having a previous shape. Ceramic materials need to be hollow if they are thick. Each ceramic piece of dolls, including ball-jointed dolls, are like little tubes and vases. There has to be a space where air can escape. Aside from this, ideally, the thickness of the pieces should be almost equal. Fortunately, because my pieces are small, then a little variation in thickness would not crack the piece while it is in the kiln being fired to more than 2300ºF.
So, if I am to make the shapes by hand, it would be difficult and impractical, the shapes would be irregular and the pieces would dry and crack even before I come up with a perfect shape.
Plaster has a strange characteristic. It is hard as stone, but it absorbs water. So liquid ceramic called a "slip" would be poured into a mold made of plaster, and the plaster would absorb the water from the ceramic slip, first absorbing the water of the slip that touches the mold. So, after a few minutes, depending on how thick you would want the ceramic to be, you would pour out the excess slip, so that there would be a layer of ceramic that has taken the shape of the mold, and the interior would be hollow. The hole of the mold, where the ceramic slip was poured in, would also result in a hole on the ceramic, much like a vase would have a hole.
So, the plaster mold stage is needed. If the piece is supposed to be one of a kind, then the mold would no longer be used. However, when it comes to doll art, usually the body needs to be standardized, so the size would be the same, and people can switch dresses and costumes between dolls. The way to make the dolls one of a kind, in my opinion, is not the one-time use of doll parts. A gallery owner, answered this question for me, without even me asking her opinion about this.
She said that I should see the dolls that I make as a canvas. As a canvas or material, I can make one-of-a-kind compositions, by varying the color, the markings, and even using one or more as part of a larger arrangement. So a doll can become one-of-a-kind, if I change the hair color, skin colors and markings, costumes, and if I group them or include them in different settings or themes.
I still cannot really encourage people to play with my work, because ceramic materials break if dropped. Commercially available dolls don't break when they are dropped. While both are collectible, you lose a lot if the ceramic breaks.
Saturday, June 18, 2011
Doll Stand, leather lining, wiring, bad feet and hands

I wanted to see my progress, so you'll see that the hands and feet still need work and don't look acceptable. The rest seem to be okay enough. It's enough because there's always room for improvement, and then new ideas also come up.

What's funny about making these, I've shown my work to some of my gallery friends and they could accept the bad feet above, and sell it as fine art. On the other hand, if I show this to doll stores, they would not accept it for their customers.

A few gallery owners told me that I might consider just leaving them as is, and not even painting, glazing, putting clothes or hair on my works.
My progress may be slow for some people, but I'm happy with my pace. This is why I'm sharing now, because the perception of a final, finished work varies with people, and it might take a while to meet everyone's expectations, including mine.
My first porcelain doll head

I wanted to see if I made a mold that had two pieces for the face would work, and it did. This is why you see the seam running down the middle of the face.
Ceramic shrinks so you will notice that the doll head on the right is smaller than the one that just came out of the mold, even though it has completely dried. The temperature for porcelain is a little more than 6 times the temperature for baking a cake. Think about baking a cake inside a volcano.

As you are probably learning a few things about porcelain and moldmaking from the pictures above, I can't help but look at the wheels of my stolen bike behind the table. I went to a cafe and closed the cafe at 11 p.m. I had with me my ebook reader, and was enjoying reading Harry Potter. I came out and the bike, which I chained to the bike rack, together with 5 or 6 other bikes, was gone. I walked home and then called the police. They came and told me I was the 4th person that night. They explained to me that in the big city, aside from thieves who sell or pawn them, the homeless and drug dealers also steal bikes. Then they pointed to a man who looked poor who was riding a kid's bike across the street. They explained that the drug dealers use it for their drug runs, and since serial numbers can be traced, then they are better off using a bike they did not buy themselves.
Friday, June 17, 2011
Two pics from January--My progress, Ball-Jointed Ceramic Doll BJD

I have gallery friends, who have known me for years, and then I also have friend friends. Once in a while, I would show my progress to them. Below are two pictures from my cellphone which I shared with them.
The process of making my ceramics, not necessarily doll-making, is to sculpt from polymer clay, then make a mold, then make ceramic slip (which is clay with a lot of water, so it has the consistency of pancake batter), then drying and sanding the pieces, and then putting the pieces in the kiln. This shrinks the pieces, and thin pieces shrink more than thick pieces. While the pieces are small, and the goal is to make small pieces, there has to be enough room inside the pieces to fit metal springs to get the pieces attached to each other.

Each step has its own set of disciplines, and even mold-making, while it is an "invisible" step, something you cannot see on the final porcelain, has a set of skills you have to know and develop on your own. When I worked on the first set of body parts, which were larger, I went ahead to make the plaster molds, even though I knew I would sculpt a better prototype later. Rather than dwelling on sculpting polymer clay to keep make better and better pieces, I needed to make the molds so that I can also begin practicing on not just making the molds but also to begin practicing and gaining experience making and pouring the ceramic slip.
So I started with a larger prototype, which I knew would not be final, but I still went ahead to make the molds for it, because I can't wait to make a complete, perfect polymer clay prototype before I even start learning anything about mold-making.
At this point, I decided to make a smaller doll, so I made the heads first, and then the body parts, and then decided to make the ceramic for the body parts, put the parts in the kiln, and just use the old hands and feet, just to see a more finished porcelain stage, at least see if the heads and the body parts match, not counting the hands and feet. However, I needed hands and feet like you would need end loops or pin heads to keep jewelry pieces together, so I used akward, larger, earlier versions of hands and feet.
Subscribe to:
Posts (Atom)