Monday, June 20, 2011

A doll's face on December 23 2010 - Saying goodbye to my camera


I lost my Nikon camera last Saturday. I don't think I left it at the Dana Hotel's Vertigo Sky Lounge (it's a bar). My group had a thing to do, so I was there early at 3 p.m. to help out. The party was to start at 4 p.m. I had no plans to drink early, I had a bottle of Diet Mountain Dew. Angel, the host, threw it out, because he didn't know it was mine, and he offered to get me a drink, but I refused. I got drunk later on when everything was fine and Angel didn't need me anymore. My friend Gabriel was supposed to help out as well, but he had an appointment. When his appointment was over, he came to the venue. 

I was just lucky to have Gabriel follow me because we went home together, I remember going down the elevator, walking a few to the McDonald's next to the train stop, and after that I seem to have lost track of time. I recall he bought two bags of food at McDonald's, he ate his on the train while I clutched mine, I remember I dropped a burger on the train, picked it up and put it back in the bag, I remember walking home and as soon as he went into his apartment and I got into mine, I immediately slept on my floor, and tried to get over my drunken stupor by sleeping it off. That must have been around 7 p.m., but it seemed like time flew, like the exit out of the hotel and into my place only took a few minutes. I woke  up groggy around after midnight, and then I ate the bag of McDonald's. Even then I ate a double cheeseburger and the second one I couldn't taste enough to figure out if it was a fish fillet or a McChicken. The third thing was an apple pie.


I just want to say goodbye to my camera. I probably deserve losing it. I seldom get drunk and last Saturday, I was not in my safe place, but looking at the photographs (and videos I have yet to post), from that Nikon camera, and at the date I took it, December 23rd, I get the feeling I would get rewarded later on, as long as I keep improving my craft.

I finally make more doll parts on March 2011

I finally make the doll parts for the doll, including the hands and feet. You will notice the shapes and sizes are smaller.


This was in March, but I was busy doing something else in February. I had done some of these above in January, and then I let the pieces air dry all the way to March. The picture above is still in the chalky stage. I had been sanding them, but breaking a lot of them along the way. If you ask me, I need better hands and eyes. Making progress nonetheless. 

I worked from New Year's Eve up to noontime on New Years Day

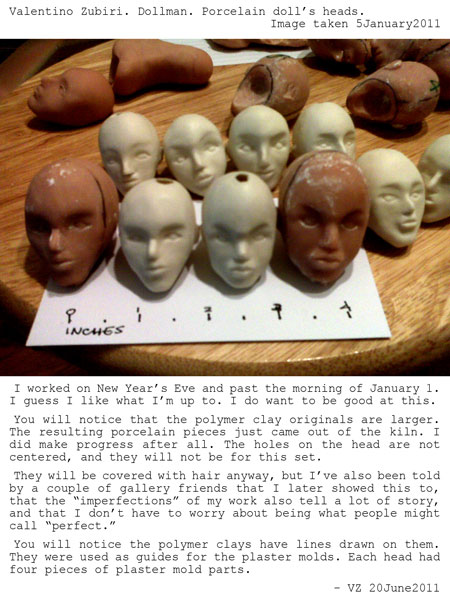
I considered New Year's Day as another "working day."  I was into what I was doing, it's not like this art is tedious, not for me. I am doing what I like to do, and I know there will be rewards. I thought I would make progress and I did. I came up with 8 doll heads, which I was happy with. I got to make plaster molds for each one of them. 


This first set, I forgot to pierce the ears, but I was not into making any earrings yet, I needed to see how they would look like, before I went ahead to making molds of the body parts. 


The polymer clay prototypes have lines on them which I used as guides when making the plaster molds. Each plaster mold for each doll head is made up of 4 interlocking pieces: 1. the side for the face, 2. the side for the base (where the neck would attach), and 3. two left and right sides for the back. The hole for pouring would be on the head, and that resulting hole produced on the ceramic would also serve another purpose--the way the head is secured to the rest of the body is through springs and a final wire would hook through the hole on the head. 

The head would be covered with hair (or not, if I decide otherwise), so (maybe) the wires and the holes would be hidden from view.

You will notice that the ceramic shrinks after the kiln. 

I worked on my art even on Christmas Eve and Christmas Day and made progress

If you look at some of the photographs, some were taken on December 8 and some on December 23, 2010.

I remember working even on Christmas Eve and Christmas Day. I did not go out, nor celebrate with anyone. I always have this thought that on days when I know people are having parties and socializing, I would prefer to be by myself, and try to make progress on whatever endeavor I do. It is a little lonely, but that's another story.


I shelved the first doll design because I thought it was too tall, even though I had already made the plaster molds. It was good practice up to that point, because I was a little afraid of making a smaller, shorter doll, because a smaller doll would mean a smaller face, and tinier features which I did not want to tackle early on. So when I was confident enough to make a shorter doll, I went ahead and started sculpting smaller heads.


At first, I started with baking the eyeballs first, then sticking them into bigger balls that were the heads. 


Later on, I realized that although I was just practicing, and baking the works for posterity, I was probably using too much of my polymer clay. So I decided to just make the faces and then add the backs of the heads later if I wanted to. 


I started making childlike heads and then childlike faces, and that was because the eyeballs were a little too big for the heads. I also read somewhere that having a wide-eyed look makes people attractive, because that is the young, inquisitive, inviting look of a baby. The way I positioned the eyes and because they don't have eyelids yet, made them look a lot like children.


I knew I had to alter the approach I was doing with the eyes. When I did a different approach to the eyes, I was able to make the faces look a little more mature. I then experimented with making male- and female-looking faces. 

  
Another challenge was to see if I can make the faces look ethnically distinguishable, or something like that. The faces above all look different, but I would still consider them accidents. Even now, I want to keep making faces. I will eventually practice sculpting exact likenesses of people at the scale of an inch from ear to ear.


Sunday, June 19, 2011

The first doll head I was able to make a porcelain ceramic of


Making a ceramic porcelain ball-jointed doll involves a lot of stages, and I soon discovered that each stage had its own set of "trade secrets."

So, I sculpted from polymer clay, and assumed that the shapes could be made into plaster molds, and then into porcelain.


While I was learning to sculpt, I also proceeded to make plaster molds for some parts which I thought was acceptable for the next stage. The reason for this is that I also needed to learn how to make plaster molds, even while I was just learning to use polymer clay.


So while I was also learning how to make plaster molds, I proceeded to make the ceramic slip and pour them into the molds that I had made. 


Experience, and going through all the processes / stages are the only way to learn, and I went through a lot of trial and error. Even now, I would not consider myself halfway to becoming an expert. 

The head pictured above was my first ever doll's head that I was able to make. Eventually, I was able to match the head with an acceptable set of parts, but I decided that I was torturing myself, in a way, because I had too many parts to manage. I made a torso with detachable / movable breasts, and shoulders that could shrug, and toes that can tiptoe. I also separated the neck from the torso and the head. Then almost overnight, I woke up and thought that I was creating something that was too tall, and I suddenly wanted a smaller doll! So I stopped working on this one, and started work on a smaller doll.  

I would probably go back to making this first design later, but not yet. 

My plaster molds


I have been asked why I would use plaster molds because plaster molds allow for making several pieces, and so how can an artist claim that the work is one of a kind?

Well, I'm assuming that the person does not understand the processes involved in making a doll, ball-jointed doll, or any type of porcelain or ceramic sculpture. Some knowledgeable people would laugh this off, and be kind of insulting. Maybe I would tell the person to research some more on his or her own the things or factors that are involved in ceramics.


The only way forms like the doll pieces can be created is by using a plaster mold, and the only way a plaster mold can be created is by having a previous shape. Ceramic materials need to be hollow if they are thick. Each ceramic piece of dolls, including ball-jointed dolls, are like little tubes and vases. There has to be a space where air can escape. Aside from this, ideally, the thickness of the pieces should be almost equal. Fortunately, because my pieces are small, then a little variation in thickness would not crack the piece while it is in the kiln being fired to more than 2300ºF.

So, if I am to make the shapes by hand, it would be difficult and impractical, the shapes would be irregular and the pieces would dry and crack even before I come up with a perfect shape.

Plaster has a strange characteristic. It is hard as stone, but it absorbs water. So liquid ceramic called a "slip" would be poured into a mold made of plaster, and the plaster would absorb the water from the ceramic slip, first absorbing the water of the slip that touches the mold. So, after a few minutes, depending on how thick you would want the ceramic to be, you would pour out the excess slip, so that there would be a layer of ceramic that has taken the shape of the mold, and the interior would be hollow. The hole of the mold, where the ceramic slip was poured in, would also result in a hole on the ceramic, much like a vase would have a hole.

So, the plaster mold stage is needed. If the piece is supposed to be one of a kind, then the mold would no longer be used. However, when it comes to doll art, usually the body needs to be standardized, so the size would be the same, and people can switch dresses and costumes between dolls. The way to make the dolls one of a kind, in my opinion, is not the one-time use of doll parts. A gallery owner, answered this question for me, without even me asking her opinion about this.

She said that I should see the dolls that I make as a canvas. As a canvas or material, I can make one-of-a-kind compositions, by varying the color, the markings, and even using one or more as part of a larger arrangement. So a doll can become one-of-a-kind, if I change the hair color, skin colors and markings, costumes, and if I group them or include them in different settings or themes.

I still cannot really encourage people to play with my work, because ceramic materials break if dropped. Commercially available dolls don't break when they are dropped. While both are collectible, you lose a lot if the ceramic breaks.

Saturday, June 18, 2011

Doll Stand, leather lining, wiring, bad feet and hands


I wanted to see my progress, so you'll see that the hands and feet still need work and don't look acceptable. The rest seem to be okay enough. It's enough because there's always room for improvement, and then new ideas also come up.

What's funny about making these, I've shown my work to some of my gallery friends and they could accept the bad feet above, and sell it as fine art. On the other hand, if I show this to doll stores, they would not accept it for their customers. 

A few gallery owners told me that I might consider just leaving them as is, and not even painting, glazing, putting clothes or hair on my works.

My progress may be slow for some people, but I'm happy with my pace. This is why I'm sharing now, because the perception of a final, finished work varies with people, and it might take a while to meet everyone's expectations, including mine. 

My first porcelain doll head


I wanted to see if I made a mold that had two pieces for the face would work, and it did. This is why you see the seam running down the middle of the face.

Ceramic shrinks so you will notice that the doll head on the right is smaller than the one that just came out of the mold, even though it has completely dried. The temperature for porcelain is a little more than 6 times the temperature for baking a cake. Think about baking a cake inside a volcano.


As you are probably learning a few things about porcelain and moldmaking from the pictures above, I can't help but look at the wheels of my stolen bike behind the table. I went to a cafe and closed the cafe at 11 p.m. I had with me my ebook reader, and was enjoying reading Harry Potter. I came out and the bike, which I chained to the bike rack, together with 5 or 6 other bikes, was gone. I walked home and then called the police. They came and told me I was the 4th person that night. They explained to me that in the big city, aside from thieves who sell or pawn them, the homeless and drug dealers also steal bikes. Then they pointed to a man who looked poor who was riding a kid's bike across the street. They explained that the drug dealers use it for their drug runs, and since serial numbers can be traced, then they are better off using a bike they did not buy themselves.

Friday, June 17, 2011

Two pics from January--My progress, Ball-Jointed Ceramic Doll BJD


I have gallery friends, who have known me for years, and then I also have friend friends. Once in a while, I would show my progress to them. Below are two pictures from my cellphone which I shared with them. 

The process of making my ceramics, not necessarily doll-making, is to sculpt from polymer clay, then make a mold, then make ceramic slip (which is clay with a lot of water, so it has the consistency of pancake batter), then drying and sanding the pieces, and then putting the pieces in the kiln. This shrinks the pieces, and thin pieces shrink more than thick pieces. While the pieces are small, and the goal is to make small pieces, there has to be enough room inside the pieces to fit metal springs to get the pieces attached to each other.


Each step has its own set of disciplines, and even mold-making, while it is an "invisible" step, something you cannot see on the final porcelain, has a set of skills you have to know and develop on your own. When I worked on the first set of body parts, which were larger, I went ahead to make the plaster molds, even though I knew I would sculpt a better prototype later. Rather than dwelling on sculpting polymer clay to keep make better and better pieces, I needed to make the molds so that I can also begin practicing on not just making the molds but also to begin practicing and gaining experience making and pouring the ceramic slip.

So I started with a larger prototype, which I knew would not be final, but I still went ahead to make the molds for it, because I can't wait to make a complete, perfect polymer clay prototype before I even start learning anything about mold-making.

At this point, I decided to make a smaller doll, so I made the heads first, and then the body parts, and then decided to make the ceramic for the body parts, put the parts in the kiln, and just use the old hands and feet, just to see a more finished porcelain stage, at least see if the heads and the body parts match, not counting the hands and feet. However, I needed hands and feet like you would need end loops or pin heads to keep jewelry pieces together, so I used akward, larger, earlier versions of hands and feet.


Tuesday, June 14, 2011

Porcelain and polymer clay doll heads

Here are two pictures of my early doll heads.  I sculpt using polymer clay, and then make the molds for porcelain.  You can sculpt porcelain, but that's another topic. 


The white head on the left is porcelain at the bisque stage.  It was my first ever doll's head which I felt was okay.  It took me such a long time to sculpt the initial polymer clay.  After the polymer clay stage, I immediately wanted to learn how to make molds and get to the porcelain stage, because I needed to learn all the different stages of the doll-making process.  After this, I went back to sculpting heads and decided to try making children's heads.  I got to this point below, to the ability to make symmetrical faces after practicing to make as much as 1000 doll heads using my chosen polymer clay.  Practice makes perfect, but then again, nothing is really perfect or final, since new things and ideas crop up.

It is okay to copy my pics and my text on your blog or online website as long as you credit me. 

Comparing the ceramic porcelain doll heads with the original polymer clay

Immediately after getting the pieces cooled after kiln use, I was excited to see how the pieces would look together, so I used clay to connect them, and then placed the head on top.  I was still not making new versions of the hands and feet, so the hands you see above are just okay, but not quite well-formed.


Finally beginning to add Pictures of my Porcelain Doll / Dollwork

This will be the first of a lot of pics that I have taken so far.  I also have videos, but I'm just now beginning to take time to learn how to edit the clips to get the jitters out and stabilize the footage(s).


I'm not posting according to the timeline.  I'll be jumping back and forth, depending on which batch of pics I'm able to edit / retouch.  I have earlier sets of pictures from my cellphone, which I took as I felt comfortable enough, not to share them online, but to send them to a few friends with whom I was sharing my progress.

I don't plan to show "perfect" dolls anytime soon.  I kinda realized that all this porcelain doll project takes time, I'm just grateful I'm at this stage in my learning.  I know that porcelain dolls can be collectible, but I don't know if I will be collectible, my eyes are not the best and I can't get a steady hold of the porcelain doll pieces when they are at a chalky stage, as I smoothen them out, so I tend to break a lot of them.

Porcelain dolls are very difficult to make.  I have no plans to produce these in commercial quantity, I would rather be represented by a fine art gallery that can sell whatever little quantity I have.  I will eventually look for a gallery or two, but I'm also a writer, I will also eventually try to get an agent and a publisher.  I love procrastination, and sharing on the internet is very stressful for me, which makes me procrastinate even more.


Wednesday, June 8, 2011

It's been a while

I was busy with other stuff, but I'm getting back to my ceramics. Starting now!!! Again!!!
I need to force myself to promote while being busy with the art. It's not a comfortable place.